一,服务器系统
RedHat Enterprise Linux 5.0
二,数据库软件
Oracle10g (10.2.0)
三,硬件基本需求(命令查看需求如图)
内存/512M
交换分区/1G
tmp目录大小/400M
安装空间/2G
检查内存和交换分区的大小:·
[root@test /]# grep MemTotal /proc/meminfo
MemTotal: 515296 kB
[root@test /]# grep SwapTotal /proc/meminfo
SwapTotal: 1052248 kB
四、软件基本要求:要装一下rpm包。
make-3.79.1
gcc-3.2.3-34
glibc-2.3.2-95.20
compat-db-4.0.14-5
compat-gcc-7.3-2.96.128
compat-gcc-c++-7.3-2.96.128
compat-libstdc++-7.3-2.96.128
compat-libstdc++-devel-7.3-2.96.128
libXp
openmotif21-2.1.30-8
setarch-1.3-1
然后检查是不是装了:
[root@test Server]# rpm -q binutils compat-libstdc++ elfutils-libelf elfutils-libelf-devel gcc gcc-c++ glibc glibc-common glibc-devel glibc-headers libaio libaio-devel libgcc libstdc++ libstdc++-devel make sysstat unixODBC unixODBC-devel libXp
binutils-2.17.50.0.6-12.el5
package compat-libstdc++ is not installed
elfutils-libelf-0.137-3.el5
package elfutils-libelf-devel is not installed
gcc-4.1.2-46.el5
gcc-c++-4.1.2-46.el5
glibc-2.5-42
glibc-common-2.5-42
glibc-devel-2.5-42
glibc-headers-2.5-42
libaio-0.3.106-3.2
libaio-devel-0.3.106-3.2
libgcc-4.1.2-46.el5
libstdc++-4.1.2-46.el5
libstdc++-devel-4.1.2-46.el5
make-3.81-3.el5
sysstat-7.0.2-3.el5
unixODBC-2.2.11-7.1
unixODBC-devel-2.2.11-7.1
libXp-1.0.0-8.1.el5
显示package compat-libstdc++ is not installed 说明没有安装,接下来,我们安装。
首先找出compat-libstdc++这个的rpm包,如下
[root@test /]# cd /mnt/Server/
[root@test Server]# ls -l compat-libstdc*
-r--r--r-- 341 yangleitse root 92078 2007-01-19 compat-libstdc++-296-2.96-138.i386.rpm
-r--r--r-- 341 yangleitse root 237109 2007-01-19 compat-libstdc++-33-3.2.3-61.i386.rpm
[root@test Server]# rpm -ivh compat-libstdc++-296-2.96-138.i386.rpm
warning: compat-libstdc++-296-2.96-138.i386.rpm: Header V3 DSA signature: NOKEY, key ID 37017186
Preparing... ########################################### [100%]
package compat-libstdc++-296-2.96-138.i386 is already installed
说明安装成功,照这个步骤把其他类似的也安装完。
接下来,修改系统的版本
oracle10 Incompatible linux5 so Modify
[root@ test ~]#vi /etc/redhat-release
将Red Hat Enterprise Linux Server release 5.2 (Tikanga)替换为redhat-4
五、设置内核参数
[root@test ~]# vi /etc/sysctl.conf
kernel.sem = 250 32000 100 128
net.ipv4.ip_local_port_range = 1024 65000
net.core.rmem_default = 4194304
net.core.rmem_max = 4194304
net.core.wmem_default = 262144
net.core.wmem_max = 262144
设置完后保存。
然内核参数立即生效:
[root@test ~]# sysctl -p
kernel.sem = 250 32000 100 128
net.ipv4.ip_local_port_range = 1024 65000
net.core.rmem_default = 4194304
net.core.rmem_max = 4194304
net.core.wmem_default = 262144
net.core.wmem_max = 262144
七、添加oracle组和用户
[root@test ~]# groupadd oinstall
[root@test ~]# groupadd dba
[root@test ~]# useradd -g oinstall -G dba oracle
[root@test ~]# mkdir /home/db
[root@test ~]# chown -R oracle:oinstall /home/oracle
八、编辑Oracle用户下的环境变量:
[root@test ~]# vi /home/oracle/.bash_profile
# .bash_profile
# Get the aliases and functions
if [ -f ~/.bashrc ]; then
. ~/.bashrc
fi
# User specific environment and startup programs
#oracle add
export ORACLE_SID=orcl
export ORACLE_BASE=/db/oracle
export ORACLE_HOME=$ORACLE_BASE/product/10.2.0
export PATH=$PATH:/ORACLE_HOME/bin:$HOME/bin
export LD_LIBRARY_PATH=$ORACLE_HOME/lib:/usr/lib
export LC_CTYPE=en_US.UTF-8
设置oracle内核:
[root@test oracle]# vi /etc/security/limits.conf
在源文件最后加上:
oracle soft nproc 2047
oracle hard nproc 16384
oracle soft nofile 1024
oracle hard nofile 65536
[root@test oracle]# cat /dev/null>/etc/pam.d/login
[root@test oracle]# vi /etc/pam.d/login
session required /lib/security/pam_limits.so
session required pam_limits.so
[root@test oracle]# vi /etc/profile
if [ $USER = "oracle" ]; then
if [ $SHELL = "/bin/ksh" ]; then
ulimit -p 16384
ulimit -n 65536
else
ulimit -u 16384 -n 65536
fi
fi
九、修改/etc/hosts:
127.0.0.1 RHEL5 localhost.localdomain localhost
modify
127.0.0.1 localhost.localdomain localhost
192.168.100.4 RHEL5
modify
127.0.0.1 localhost.localdomain localhost
192.168.100.4 RHEL5
配置完后,在root用户在执行:xhost +
上传oracle10g包,解压
执行这个:./ runInstaller 成功的话会弹出以下安装窗口
配置数据库实力和密码:

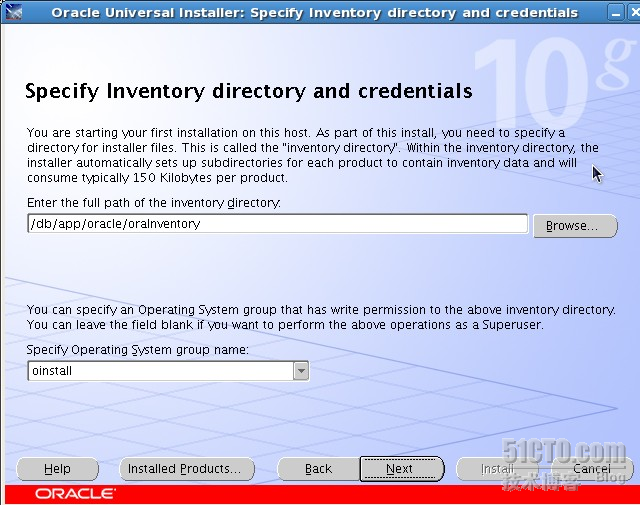
配置Inventory目录
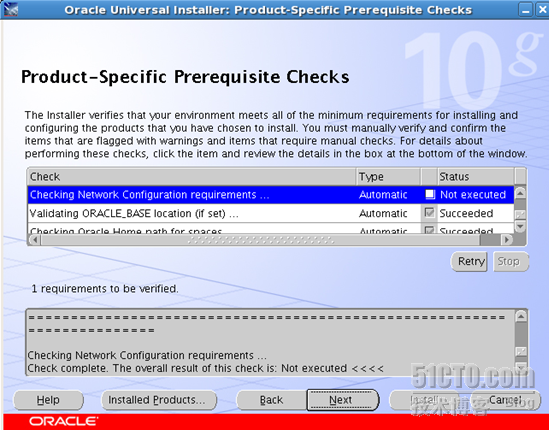
系统安装前的环境检查:
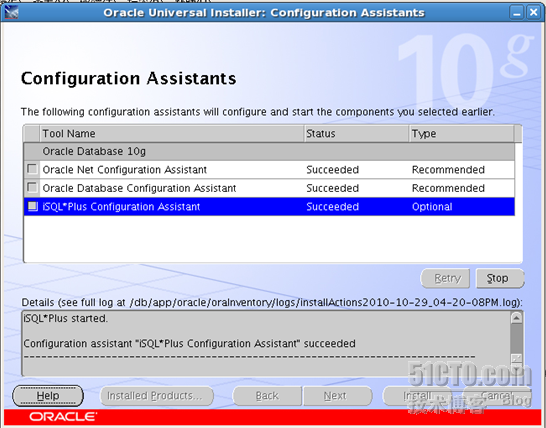
检查后的安装环境和安装组件

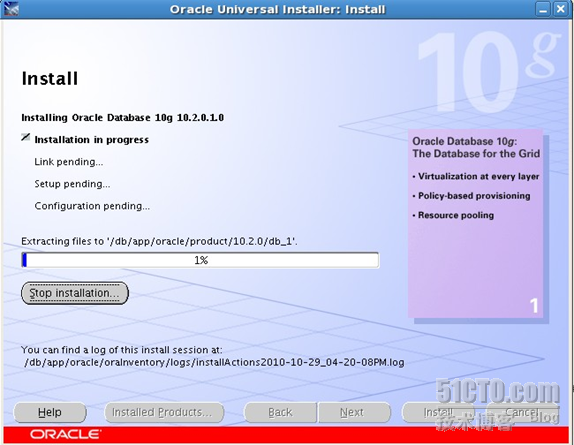
开始复制正式安装文件:


执行完有错误,

出现这个的原因是因为要到root用户找到/db/app/oracle/oraInventory
[root@yanglei oraInventory]# ./orainstRoot.sh
Changing permissions of /db/app/oracle/oraInventory to 770.
Changing groupname of /db/app/oracle/oraInventory to oinstall.
The execution of the script is complete
然后就OK了
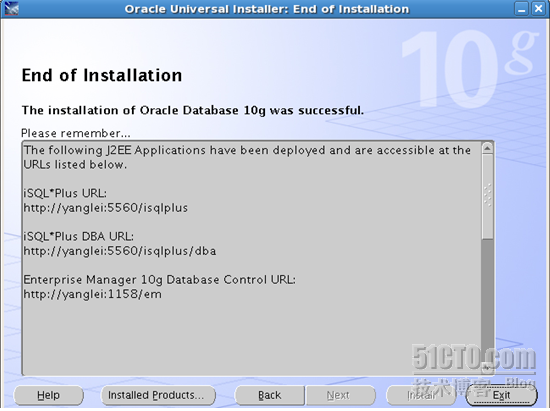
安装完成!