主机端实时获取Hololens2的RGBD数据流
整体流程是仿照Github官方文档和这位博主的,具体细节根据个人习惯做了修改并补充了一些说明。
0. 环境配置
Windows10
Unity 2020.3.31f1c1
VS2019
Python3.6
1. 打开Hololens的研究者模式(非常重要)
如果不打开的话,程序是无法访问到眼镜传感器数据的
https://blog.csdn.net/scy261983626/article/details/108754517
2. 下载Github工程
HoloLens2-Unity-ResearchModeStreamer
下面的步骤都是基于官方文档来的:

3. 配置VS环境
Release+ARM64
- 工程项目中Eigen库好像没有用到,可以注释掉
- lib库里放了Opencv4.X的库,我们需要根据自己的Opencv替换
之后Build就好了,不要运行,因为输出是dll,输出位置在
Your LocationHoloLens2-Unity-ResearchModeStreamerHL2RmStreamUnityPluginARM64ReleaseHL2RmStreamUnityPlugin
4. 配置Unity环境
- Platform先转换到UWP
新建文件夹和文件
- 在ARM64文件夹中放上面的
HL2RmStreamUnityPlugin.dll - 在Scripts文件夹中新建C#脚本文件,命名为:
StreamerHL2.cs
其实也不需要新建这么多的,放在一起也行。之所以这么命名也是为了和Github上保持一致。

StreamerHL2.cs中的内容:
using System.Collections;
using System.Collections.Generic;
using UnityEngine;
using System;
using System.Runtime.InteropServices;public class StreamerHL2 : MonoBehaviour
{ [DllImport("HL2RmStreamUnityPlugin", EntryPoint = "Initialize", CallingConvention = CallingConvention.StdCall)]public static extern void InitializeDll(); void Start(){ InitializeDll();}void Update(){ }}-
将StreamerHL2.cs文件拖到Main camera上实现挂载

-
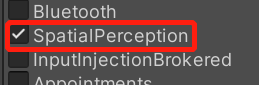
接着设置Unity 项目的兼容性,根据下图指引,勾选
InternetClient, InternetClientServer, PrivateNetworkClientServer, WebCam, SpatialPerception5个位置

-
编译unity工程,注意架构选择的是ARM64. 然后build到一个新文件夹
ps. 不需要在unity中运行工程,因为我们添加的是ARM64的动态链接库,在PC端运行的话会报加载不了的错误。

5. 配置Unity的package文件中的兼容性
- 打开编译好的Unity工程文件夹中的“Package.appxmanifest”文件,按照官方文档修改3处内容,如果嫌麻烦,可以直接我改完的代码:
**注意:**里面的Project1是我自己取的名字,大家可以自己改。
<Package xmlns:rescap="http://schemas.microsoft.com/appx/manifest/foundation/windows10/restrictedcapabilities" xmlns:mp="http://schemas.microsoft.com/appx/2014/phone/manifest" xmlns:uap="http://schemas.microsoft.com/appx/manifest/uap/windows10" xmlns:uap2="http://schemas.microsoft.com/appx/manifest/uap/windows10/2" xmlns:uap3="http://schemas.microsoft.com/appx/manifest/uap/windows10/3" xmlns:uap4="http://schemas.microsoft.com/appx/manifest/uap/windows10/4" xmlns:iot="http://schemas.microsoft.com/appx/manifest/iot/windows10" xmlns:mobile="http://schemas.microsoft.com/appx/manifest/mobile/windows10" IgnorableNamespaces="uap uap2 uap3 uap4 mp mobile iot rescap" xmlns="http://schemas.microsoft.com/appx/manifest/foundation/windows10"><Identity Name="Template3D" Publisher="CN=DefaultCompany" Version="1.0.0.0" /><mp:PhoneIdentity PhoneProductId="edd907fa-2c4f-49b2-89a0-9fa371043c33" PhonePublisherId="00000000-0000-0000-0000-000000000000" /><Properties><DisplayName>Proj1DisplayName><PublisherDisplayName>DefaultCompanyPublisherDisplayName><Logo>AssetsStoreLogo.pngLogo>Properties><Dependencies><TargetDeviceFamily Name="Windows.Universal" MinVersion="10.0.10240.0" MaxVersionTested="10.0.19041.0" />Dependencies><Resources><Resource Language="x-generate" />Resources><Applications><Application Id="App" Executable="$targetnametoken$.exe" EntryPoint="Template3D.App"><uap:VisualElements DisplayName="Proj1" Square150x150Logo="AssetsSquare150x150Logo.png" Square44x44Logo="AssetsSquare44x44Logo.png" Description="Template_3D" BackgroundColor="transparent"><uap:DefaultTile ShortName="Proj1" Wide310x150Logo="AssetsWide310x150Logo.png" /><uap:SplashScreen Image="AssetsSplashScreen.png" BackgroundColor="#FFFFFF" /><uap:InitialRotationPreference><uap:Rotation Preference="landscape" /><uap:Rotation Preference="landscapeFlipped" /><uap:Rotation Preference="portrait" /><uap:Rotation Preference="portraitFlipped" />uap:InitialRotationPreference>uap:VisualElements>Application>Applications><Capabilities><rescap:Capability Name="perceptionSensorsExperimental" /><Capability Name="internetClient" /><Capability Name="internetClientServer" /><Capability Name="privateNetworkClientServer" /><uap2:Capability Name="spatialPerception" /><DeviceCapability Name="webcam" />Capabilities>
Package>
6. 将Unity工程部署到Hololens中
请移步到我之前的博文:Hololens 2 + Unity环境配置的第8条
7. Python获取视频流
打开Github工程中的hololens2_simpleclient.py文件,根据自己的ip修改HOST
之后就传输成功啦!!!如果部署成功的话,眼镜第一次打开你Unity的app时应该会弹出 是否允许访问相机之类的提醒,点击是,眼镜就会出现一个界面,里面是你Unity的场景,不用管它。然后再运行Python程序,电脑上就会出现两个窗口了,眼镜里是没有变化的。
注意:要把电脑上的防火墙关了。
如果出现[winerror 10060]的问题,基本上就是没打开研究者模式,返回第一条检查一下。自己就是卡在这里卡了2天, 我一开始打开的方式不对
延迟问题:
Hololens传感器的采样频率远大于普通wifi传输的频率。这就导致Hololens的缓存区一直存放着大量图像数据,表现出来就是PC端这边滞后特点。
Hololens的深度传感器在短流模式下的采样频率大约在30Hz-45Hz之间,Wifi连接只能达到<5Hz。
滞后的时间大约为T*37/n,其中T为程序运行时长,n为你自己PC的Socket接收频率
即程序运行的时间越长,滞后性越长。
8. 解决实时视频流传输
https://blog.csdn.net/scy261983626/article/details/116381193
修改HL2RmStreamUnityPlugin.sln工程
降低HL往PC端发送数据的频率,即并不是把每一帧采集的图像数据都传输到PC端。
HL2RmStreamUnityPlugin.cpp文件中:
co_await m_pVideoFrameProcessor->InitializeAsync(m_pVideoFrameStreamer);->co_await m_pVideoFrameProcessor->InitializeAsync(m_pVideoFrameStreamer, 2000000);auto processor = std::make_shared->( m_pAHATSensor, camConsentGiven, &camAccessCheck, 0, m_pAHATStreamer); auto processor = std::make_shared( m_pAHATSensor, camConsentGiven, &camAccessCheck, 2000000, m_pAHATStreamer);
(这里的 2000000是200ms的意思,程序里面采用CPU时间单位,即百纳秒,1ms = 10^4百纳秒)
ResearchModeFrameStreamer.cpp文件中:

因为眼镜数据输出的顺序和python的numpy转换的顺序刚好是反的,所以原工程接收到数据是有问题的。
更多相关:
-
manifest原理和用途 dll是被动态调用的,所以会被若干个程序共享使用的 但是如果dll在应用程序不知道的情况下升级了、或是被另一个程序更改了,就可能会出现问题,即”DLL Hell” 随着系统资源越来越丰富,硬盘不那么紧张,所以在XP以后的操作系统中,用新的机制来管理DLL (这种机制,这不仅仅是对于.NET...