Udacity机器人软件工程师课程笔记(一)-样本搜索和找回-基于漫游者号模拟器
Robotics Software engineer编程笔记(一)
使用Udacity提供的漫游者号模拟器创建环境地图,寻找样本。
该项目是根据美国国家航空航天局(NASA)的样本返回挑战进行建模的。我使用的windows平台下的模拟器,也是基于windows平台下的模拟器进行学习。
所使用的环境是python3.6, IDE为pycharm 2019。
下面提供其他两种平台的模拟器的下载链接。
Linux模拟器
Windows模拟器

这是模拟器主界面,分为训练模式和自动模式。关于漫游者号的训练以及训练参数的保存可以参考我的上一篇文章使用Keras训练自动驾驶(使用Udacity自动驾驶模拟器),关于漫游者号模型的保存与之类似,我就不详细记录了。
一、图像二值化
在这里我使用了cv.cvtColor(image, cv.COLOR_BGR2GRAY)将输入的image转换成灰度图像和cv.threshold(image_gray, thresh, 255, cv.THRESH_BINARY)函数将之前所得到的灰度图像进行二值化处理。
下面是所定义的二值化函数,image为输入的图片,函数的默认输入阈值为200。其中cv.threshhold函数返回两个值,第一个为阈值,第二个为输出的图像。
import cv2 as cv
…
def color_thresh(image, thresh=200):image_gray = cv.cvtColor(image, cv.COLOR_BGR2GRAY)ret, image_thresh = cv.threshold(image_gray, thresh, 255,cv.THRESH_BINARY)
return image_thresh
…
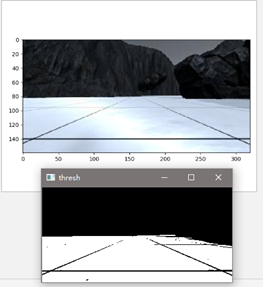
这两个图分别用opencv和matplotlib输出.
注意:
- 在使用opencv时,在程序末尾加上cv.waitKey().
- 使用matplotlib时,在imshow()函数后面加上show()函数
二、图像的透视变换
 (Perspective Transformation)是将成像投影到一个新的视平面(Viewing Plane),也称作投影映射(Projective Mapping)。
1. M = cv2.getPerspectiveTransform(src, dst)
参数说明
src:源图像中待测矩形的四点坐标
sdt:目标图像中矩形的四点坐标 返回由源图像中矩形到目标图像矩形变换的矩阵M
2. dst = cv2.warpPerspective(src, M, dsize[, dst[, flags[, borderMode[, borderValue]]]])
参数说明:
src:输入图像
M:变换矩阵
dsize:目标图像shape
flags:插值方式,interpolation方法INTER_LINEAR或INTER_NEAREST
borderMode:边界补偿方式,BORDER_CONSTANT or BORDER_REPLICATE
borderValue:边界补偿大小,常值,默认为0
或者 dst = cv2.perspectiveTransform(src, m[, dst])
参数
src:输入的2通道或者3通道的图片
m:变换矩阵
返回的是相同size的图片
区别是:warpPerspective适用于图像,而perspectiveTransform适用于一组点。
3. figure语法及操作
(1) figure(num=None, figsize=None, dpi=None, facecolor=None, edgecolor=None, frameon=True)
参数说明:
num:图像编号或名称,数字为编号 ,字符串为名称
figsize:指定figure的宽和高,单位为英寸;
dpi参数指定绘图对象的分辨率,即每英寸多少个像素,缺省值为80 1英寸等于2.5cm,A4纸是 21*30cm的纸张
facecolor:背景颜色
edgecolor:边框颜色
frameon:是否显示边框
(2)例子:
import matplotlib.pyplot as plt
# 创建自定义图像
fig=plt.figure(figsize=(4,3),facecolor='blue')
plt.show()
相关程序
def perspect_transform(img, src, dst):M = cv.getPerspectiveTransform(src, dst)img_perspect = cv.warpPerspective(img, M, (img.shape[1], img.shape[0]))return img_perspect
…
dst_size = 5
bottom_offset = 6
image_thresh = color_thresh(image)
src = np.float32([[14, 140], [301 ,140],[200, 96], [118, 96]])
dst = np.float32([[image.shape[1]/2 - dst_size, image.shape[0] - bottom_offset],[image.shape[1]/2 + dst_size, image.shape[0] - bottom_offset],[image.shape[1]/2 + dst_size, image.shape[0] - 2*dst_size - bottom_offset],[image.shape[1]/2 - dst_size, image.shape[0] - 2*dst_size - bottom_offset],])
image_prespect = perspect_transform(image, src, dst)
cv.imshow('image_prespect', image_prespect)
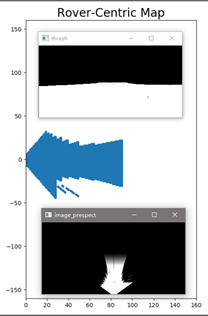
三、以漫游者号为中心的坐标
1.获取图像中非零像素点的位置,返回x,y坐标
ypos, xpos = colorsel.nonzero()
plt.plot(xpos, ypos, '.')
plt.xlim(0, 320)
plt.ylim(0, 160)
plt.show()
2.坐标转换
定义一个函数来接收二进制图像,提取图像坐标中的x和y位置,然后在漫游者号坐标中返回x和y。
# 定义从图像坐标转换函数
def rover_coords(binary_img):ypos, xpos = binary_img.nonzero()x_pixel = -(ypos - binary_img.shape[0]).astype(np.float)y_pixel = -(xpos - binary_img.shape[1]/2 ).astype(np.float)return x_pixel, y_pixel
3.综合程序
import matplotlib.pyplot as plt
import numpy as np
import cv2 as cv# 定义二值化图像函数
def color_thresh(img, thresh=200):img_gray = cv.cvtColor(img, cv.COLOR_BGR2GRAY)ret, img_thresh = cv.threshold(img_gray, thresh, 255, cv.THRESH_BINARY)return img_thresh# 定义图像映射函数,将摄像头的图像映射到平面坐标中去
def perspect_transform(img, src, dst):M = cv.getPerspectiveTransform(src, dst)  # 定义变换矩阵img_perspect = cv.warpPerspective(img, M, (img.shape[1], img.shape[0]))return img_perspect# 定义从图像坐标转换函数
def rover_coords(binary_img):ypos, xpos = binary_img.nonzero()x_pixel = -(ypos - binary_img.shape[0]).astype(np.float)y_pixel = -(xpos - binary_img.shape[1]/2 ).astype(np.float)return x_pixel, y_pixel# Define the filename, read and plot the image
filename = '.../sample.jpg'
image = cv.imread(filename)# 函数参数定义部分
# 映射的图片的一半边长
dst_size = 5
# 映射的点距离x轴的距离
bottom_offset = 0
# 将图像二值化
image_thresh = color_thresh(image)
# 定义原图像空间坐标和映射图像空间坐标
src = np.float32([[14, 140], [301, 140], [200, 96], [118, 96]])
dst = np.float32([[image.shape[1]/2 - dst_size, image.shape[0] - bottom_offset],[image.shape[1]/2 + dst_size, image.shape[0] - bottom_offset],[image.shape[1]/2 + dst_size, image.shape[0] - 2*dst_size - bottom_offset],[image.shape[1]/2 - dst_size, image.shape[0] - 2*dst_size - bottom_offset],])
# 映射图像
image_prespect = perspect_transform(image_thresh, src, dst)
# 在二值化图像寻找非零点
xpix, ypix = rover_coords(image_prespect)
fig = plt.figure(figsize=(5, 7.5))
plt.plot(xpix, ypix, '.')
plt.ylim(-160, 160)
plt.xlim(0, 160)# 输出部分
plt.title('Rover-Centric Map', fontsize=20)
plt.show()
cv.imshow('image_prespect', image_prespect)
cv.imshow('thresh', image_thresh)
cv.waitKey()
其输出为
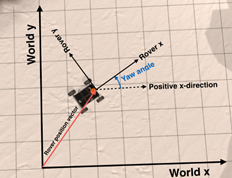
四、映射到世界坐标
我们使用的漫游者号地图尺寸大概为200m×200m,我们将要建立一个分辨率为200×200像素的俯视图,其中一个像素代表了一平方米。
现在已经生成了以了漫游者号为中心的可导航地形的地图,下一步是将这些点映射到世界坐标。我们需要将矩阵旋转后跟平移。旋转是这样理解的:当摄像机拍照时,漫游车可以指向任意方向,由它的偏航角给出。平移是为了说明漫游者在拍照时可能位于世界的任何位置。所以,这是一个两步过程:
- 旋转以漫游者号为中心的坐标,使x轴和y轴平行于世界空间中的轴。
- 通过世界中漫游者号的位置(位置矢量)给出的x和y位置值来转换旋转的位置。从正x方向逆时针测量偏航角,如下所示:
1.矩阵的旋转操作
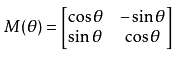
这是转移矩阵的定义,通过这个矩阵我们可以得到
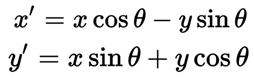
通过这个公式我们可以得到漫游者号在实际中的坐标位置
其代码如下:
def rotate_pix(xpix, ypix, yaw):yaw_rad = yaw * np.pi / 180xpix_rotated = (xpix * np.cos(yaw_rad)) - (ypix * np.sin(yaw_rad))ypix_rotated = (xpix * np.sin(yaw_rad)) + (ypix * np.cos(yaw_rad))return xpix_rotated, ypix_rotated
2.矩阵的平移操作
def translate_pix(xpix_rot, ypix_rot, xpos, ypos, scale):xpix_translated = (xpix_rot / scale) + xposypix_translated = (ypix_rot / scale) + yposreturn xpix_translated, ypix_translated
3.矩阵的范围限制
为了将坐标限制在我们200*200的范围内,我们使用Numpy.clip函数
numpy.clip(a, a_min, a_max, out=None)
解释:
clip这个函数将a数组中的元素限制在a_min, a_max之间,大于a_max的就使得它等于 a_max,小于a_min,的就使得它等于a_min。
def pix_to_world(xpix, ypix, xpos, ypos, yaw, world_size, scale):xpix_rot, ypix_rot = rotate_pix(xpix, ypix, yaw)xpix_tran, ypix_tran = translate_pix(xpix_rot, ypix_rot, xpos, ypos, scale)x_pix_world = np.clip(np.int_(xpix_tran), 0, world_size - 1)y_pix_world = np.clip(np.int_(ypix_tran), 0, world_size - 1)return x_pix_world, y_pix_world
其中xpix,ypix为输入的漫游者号的位置信息,yaw为转向角信息
(4)最终程序
import matplotlib.pyplot as plt
import numpy as np
import cv2 as cv# 定义二值化图像函数
def color_thresh(img, thresh=200):img_gray = cv.cvtColor(img, cv.COLOR_BGR2GRAY)ret, img_thresh = cv.threshold(img_gray, thresh, 255, cv.THRESH_BINARY)return img_thresh# 定义图像映射函数,将摄像头的图像映射到平面坐标中去
def perspect_transform(img, src, dst):M = cv.getPerspectiveTransform(src, dst) # 定义变换矩阵img_perspect = cv.warpPerspective(img, M, (img.shape[1], img.shape[0]))return img_perspect# 定义从图像坐标转换函数
def rover_coords(binary_img):ypos, xpos = binary_img.nonzero()x_pixel = -(ypos - binary_img.shape[0]).astype(np.float)y_pixel = -(xpos - binary_img.shape[1
更多相关:
-
教程简介
OpenCV 是计算机视觉中经典的专用库,然而其中文版官方教程久久不来。近日,一款最新 OpenCV4.1 版本的完整中文版官方教程出炉,读者朋友可以更好的学习了解 OpenCV 相关细节。教程来自 objectdetection.cn 。
教程目录
OpenCV 简介
0_OpenCV-Python Tutorials
O...
-
公众号致力于分享点云处理,SLAM,三维视觉,高精地图相关的文章与技术,欢迎各位加入我们,一起每交流一起进步,有兴趣的可联系微信:920177957。本文来自点云PCL博主的分享,未经作者允许请勿转载,欢迎各位同学积极分享和交流。IPM模型在解释自适应的IPM模型之前,首先需要了解使用相机的物理参数来描述IPM的基本模型[1](这篇...
-
公众号致力于分享点云处理,SLAM,三维视觉,高精地图相关的文章与技术,欢迎各位加入我们,一起每交流一起进步,有兴趣的可联系微信:920177957。本文来自点云PCL博主的分享,未经作者允许请勿转载,欢迎各位同学积极分享和交流。前言前段时间刚分享的AVP-SLAM文章中有一个知识点叫做IPM(逆透视变换)AVP-SLAM:自动泊车...
-
标题:The algorithm to generate color point-cloud with the registration between panoramic imageand laser point-cloud作者:Fanyang ZENG, Ruofei ZHONG 编译:点云PCL来源: https://iops...
-
目前深度图像的获取方法有激光雷达深度成像法,计算机立体视觉成像,坐标测量机法,莫尔条纹法,结构光法等等,针对深度图像的研究重点主要集中在以下几个方面,深度图像的分割技术 ,深度图像的边缘检测技术 ,基于不同视点的多幅深度图像的配准技术,基于深度数据的三维重建技术,基于三维深度图像的三维目标识别技术,深度图像的多分辨率建模和几何压缩技术...
-
#include
#include #include "opencv2/imgproc/imgproc.hpp"
#include "opencv2/highgui/highgui.hpp"
#include "opencv2/features2d/features2d.hpp"using na...
-
#include
#include
#include
#include ...
-
# 调整图像亮度input_image = cv2.cvtColor(input_image , cv2.COLOR_BGR2HSV)input_image [:, :, 2] = scale_value * input_image [:, :, 2]input_image [:, :, 2][input_image [:, :, 2...
-
area_center_gray ( Regions, Image : : : Area, Row, Column ) 计算Image图像中Region区域的面积Area和重心(Row,Column)。 cooc_feature_image ( Regions, Image : : LdGray, Direction : En...
-
1、显示一幅二值图像: >> bw = zeros(90,90);
>> bw(2:2:88,2:2:88) = 1;
>> imshow(bw);
>> 2、利用image函数显示一幅索引图像: >> [X,MAP] = imread('E:STUDY_softwareMatlab2016images11.jp...
-
iOS 相册和网络图片的存取 保存 UIImage 到相册 UIKit UIKit 中一个古老的方法,Objective-C 的形式 void UIImageWriteToSavedPhotosAlbum(UIImage *image, id completionTarget, SEL completionSelector, void...