如果您觉得C#制作的艺术字比较好玩, 但是还觉得没看够,不过瘾,那么我今天就让您一饱眼福, 看看C#如何制作的效果超酷的图像.
(注: 我之前曾写过类似的文章, 但没有原理说明, 代码注释不够详细, 也没有附相应的 Demo...因此如果您觉得好像哪看过类似的文章可以看看我之前写的...)
为了演示后面的效果, 这里有必要先让大家看看今天的原始图片:

一. 底片效果
原理: GetPixel方法获得每一点像素的值, 然后再使用SetPixel方法将取反后的颜色值设置到对应的点.
效果图:

代码实现:
private void button1_Click(object sender, EventArgs e)
{
//以底片效果显示图像
try
{
int Height = this.pictureBox1.Image.Height;
int Width = this.pictureBox1.Image.Width;
Bitmap newbitmap = new Bitmap(Width, Height);
Bitmap oldbitmap = (Bitmap)this.pictureBox1.Image;
Color pixel;
for (int x = 1; x < Width; x++)
{
for (int y = 1; y < Height; y++)
{
int r, g, b;
pixel = oldbitmap.GetPixel(x, y);
r = 255 - pixel.R;
g = 255 - pixel.G;
b = 255 - pixel.B;
newbitmap.SetPixel(x, y, Color.FromArgb(r, g, b));
}
}
this.pictureBox1.Image = newbitmap;
}
catch (Exception ex)
{
MessageBox.Show(ex.Message, "信息提示", MessageBoxButtons.OK, MessageBoxIcon.Information);
}
}
二. 浮雕效果
原理: 对图像像素点的像素值分别与相邻像素点的像素值相减后加上128, 然后将其作为新的像素点的值.
效果图: 
代码实现:
private void button1_Click(object sender, EventArgs e)
{
//以浮雕效果显示图像
try
{
int Height = this.pictureBox1.Image.Height;
int Width = this.pictureBox1.Image.Width;
Bitmap newBitmap = new Bitmap(Width, Height);
Bitmap oldBitmap = (Bitmap)this.pictureBox1.Image;
Color pixel1, pixel2;
for (int x = 0; x < Width - 1; x++)
{
for (int y = 0; y < Height - 1; y++)
{
int r = 0, g = 0, b = 0;
pixel1 = oldBitmap.GetPixel(x, y);
pixel2 = oldBitmap.GetPixel(x + 1, y + 1);
r = Math.Abs(pixel1.R - pixel2.R + 128);
g = Math.Abs(pixel1.G - pixel2.G + 128);
b = Math.Abs(pixel1.B - pixel2.B + 128);
if (r > 255)
r = 255;
if (r < 0)
r = 0;
if (g > 255)
g = 255;
if (g < 0)
g = 0;
if (b > 255)
b = 255;
if (b < 0)
b = 0;
newBitmap.SetPixel(x, y, Color.FromArgb(r, g, b));
}
}
this.pictureBox1.Image = newBitmap;
}
catch (Exception ex)
{
MessageBox.Show(ex.Message, "信息提示", MessageBoxButtons.OK, MessageBoxIcon.Information);
}
}
三. 黑白效果
原理: 彩色图像处理成黑白效果通常有3种算法;
(1).最大值法: 使每个像素点的 R, G, B 值等于原像素点的 RGB (颜色值) 中最大的一个;
(2).平均值法: 使用每个像素点的 R,G,B值等于原像素点的RGB值的平均值;
(3).加权平均值法: 对每个像素点的 R, G, B值进行加权
---自认为第三种方法做出来的黑白效果图像最 "真实".
效果图: 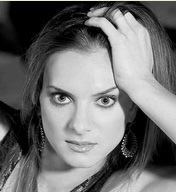
代码实现:
private void button1_Click(object sender, EventArgs e)
{
//以黑白效果显示图像
try
{
int Height = this.pictureBox1.Image.Height;
int Width = this.pictureBox1.Image.Width;
Bitmap newBitmap = new Bitmap(Width, Height);
Bitmap oldBitmap = (Bitmap)this.pictureBox1.Image;
Color pixel;
for (int x = 0; x < Width; x++)
for (int y = 0; y < Height; y++)
{
pixel = oldBitmap.GetPixel(x, y);
int r, g, b, Result = 0;
r = pixel.R;
g = pixel.G;
b = pixel.B;
//实例程序以加权平均值法产生黑白图像
int iType =2;
switch (iType)
{
case 0:
//平均值法
Result = ((r + g + b) / 3);
break;
case 1:
//最大值法
Result = r > g ? r : g;
Result = Result > b ? Result : b;
break;
case 2:
//加权平均值法
Result = ((int)(0.7 * r) + (int)(0.2 * g) + (int)(0.1 * b));
break; }
newBitmap.SetPixel(x, y, Color.FromArgb(Result, Result, Result));
}
this.pictureBox1.Image = newBitmap;
}
catch (Exception ex)
{
MessageBox.Show(ex.Message, "信息提示");
}
}
四. 柔化效果
原理: 当前像素点与周围像素点的颜色差距较大时取其平均值.
效果图: 
实现代码:
private void button1_Click(object sender, EventArgs e)
{
//以柔化效果显示图像
try
{
int Height = this.pictureBox1.Image.Height;
int Width = this.pictureBox1.Image.Width;
Bitmap bitmap = new Bitmap(Width, Height);
Bitmap MyBitmap = (Bitmap)this.pictureBox1.Image;
Color pixel;
//高斯模板
int[] Gauss ={ 1, 2, 1, 2, 4, 2, 1, 2, 1 };
for (int x = 1; x < Width - 1; x++)
for (int y = 1; y < Height - 1; y++)
{
int r = 0, g = 0, b = 0;
int Index = 0;
for (int col = -1; col <= 1; col++)
for (int row = -1; row <= 1; row++)
{
pixel = MyBitmap.GetPixel(x + row, y + col);
r += pixel.R * Gauss[Index];
g += pixel.G * Gauss[Index];
b += pixel.B * Gauss[Index];
Index++;
}
r /= 16;
g /= 16;
b /= 16;
//处理颜色值溢出
r = r > 255 ? 255 : r;
r = r < 0 ? 0 : r;
g = g > 255 ? 255 : g;
g = g < 0 ? 0 : g;
b = b > 255 ? 255 : b;
b = b < 0 ? 0 : b;
bitmap.SetPixel(x - 1, y - 1, Color.FromArgb(r, g, b));
}
this.pictureBox1.Image = bitmap;
}
catch (Exception ex)
{
MessageBox.Show(ex.Message, "信息提示");
}
}
五.锐化效果
原理:突出显示颜色值大(即形成形体边缘)的像素点.
效果图:
实现代码:
private void button1_Click(object sender, EventArgs e)
{
//以锐化效果显示图像
try
{
int Height = this.pictureBox1.Image.Height;
int Width = this.pictureBox1.Image.Width;
Bitmap newBitmap = new Bitmap(Width, Height);
Bitmap oldBitmap = (Bitmap)this.pictureBox1.Image;
Color pixel;
//拉普拉斯模板
int[] Laplacian ={ -1, -1, -1, -1, 9, -1, -1, -1, -1 };
for (int x = 1; x < Width - 1; x++)
for (int y = 1; y < Height - 1; y++)
{
int r = 0, g = 0, b = 0;
int Index = 0;
for (int col = -1; col <= 1; col++)
for (int row = -1; row <= 1; row++)
{
pixel = oldBitmap.GetPixel(x + row, y + col); r += pixel.R * Laplacian[Index];
g += pixel.G * Laplacian[Index];
b += pixel.B * Laplacian[Index];
Index++;
}
//处理颜色值溢出
r = r > 255 ? 255 : r;
r = r < 0 ? 0 : r;
g = g > 255 ? 255 : g;
g = g < 0 ? 0 : g;
b = b > 255 ? 255 : b;
b = b < 0 ? 0 : b;
newBitmap.SetPixel(x - 1, y - 1, Color.FromArgb(r, g, b));
}
this.pictureBox1.Image = newBitmap;
} catch (Exception ex)
{
MessageBox.Show(ex.Message, "信息提示");
}
}
六. 雾化效果
原理: 在图像中引入一定的随机值, 打乱图像中的像素值
效果图: 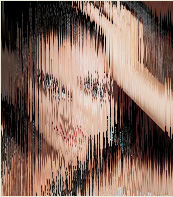
实现代码:
private void button1_Click(object sender, EventArgs e)
{
//以雾化效果显示图像
try
{
int Height = this.pictureBox1.Image.Height;
int Width = this.pictureBox1.Image.Width;
Bitmap newBitmap = new Bitmap(Width, Height);
Bitmap oldBitmap = (Bitmap)this.pictureBox1.Image;
Color pixel;
for (int x = 1; x < Width - 1; x++)
for (int y = 1; y < Height - 1; y++)
{
System.Random MyRandom = new Random();
int k = MyRandom.Next(123456);
//像素块大小
int dx = x + k % 19;
int dy = y + k % 19;
if (dx >= Width)
dx = Width - 1;
if (dy >= Height)
dy = Height - 1;
pixel = oldBitmap.GetPixel(dx, dy);
newBitmap.SetPixel(x, y, pixel);
}
this.pictureBox1.Image = newBitmap;
}
catch (Exception ex)
{
MessageBox.Show(ex.Message, "信息提示");
}
}
七. 光照效果
原理: 对图像中的某一范围内的像素的亮度分别进行处理.
效果图: 
实现代码:
private void button1_Click(object sender, EventArgs e)
{
//以光照效果显示图像
Graphics MyGraphics = this.pictureBox1.CreateGraphics();
MyGraphics.Clear(Color.White);
Bitmap MyBmp = new Bitmap(this.pictureBox1.Image, this.pictureBox1.Width, this.pictureBox1.Height);
int MyWidth = MyBmp.Width;
int MyHeight = MyBmp.Height;
Bitmap MyImage = MyBmp.Clone(new RectangleF(0, 0, MyWidth, MyHeight), System.Drawing.Imaging.PixelFormat.DontCare);
int A = Width / 2;
int B = Height / 2;
//MyCenter图片中心点,发亮此值会让强光中心发生偏移
Point MyCenter = new Point(MyWidth / 2, MyHeight / 2);
//R强光照射面的半径,即”光晕”
int R = Math.Min(MyWidth / 2, MyHeight / 2);
for (int i = MyWidth - 1; i >= 1; i--)
{
for (int j = MyHeight - 1; j >= 1; j--)
{
float MyLength = (float)Math.Sqrt(Math.Pow((i - MyCenter.X), 2) + Math.Pow((j - MyCenter.Y), 2));
//如果像素位于”光晕”之内
if (MyLength < R)
{
Color MyColor = MyImage.GetPixel(i, j);
int r, g, b;
//220亮度增加常量,该值越大,光亮度越强
float MyPixel = 220.0f * (1.0f - MyLength / R);
r = MyColor.R + (int)MyPixel;
r = Math.Max(0, Math.Min(r, 255));
g = MyColor.G + (int)MyPixel;
g = Math.Max(0, Math.Min(g, 255));
b = MyColor.B + (int)MyPixel;
b = Math.Max(0, Math.Min(b, 255));
//将增亮后的像素值回写到位图
Color MyNewColor = Color.FromArgb(255, r, g, b);
MyImage.SetPixel(i, j, MyNewColor);
}
}
//重新绘制图片
MyGraphics.DrawImage(MyImage, new Rectangle(0, 0, MyWidth, MyHeight));
}
}
八.百叶窗效果
原理:(1).垂直百叶窗效果:
根据窗口或图像的高度或宽度和定制的百叶窗显示条宽度计算百叶窗显示的条数量 ;
根据窗口或图像的高度或宽度定制百叶窗显示条数量计算百窗显示的条宽度.
(2).水平百叶窗效果: 原理同上,只是绘制像素点开始的坐标不同.
效果图: 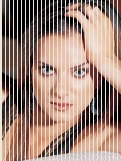

实现代码:
private void button1_Click(object sender, EventArgs e)
{
//垂直百叶窗显示图像
try
{
MyBitmap = (Bitmap)this.pictureBox1.Image.Clone();
int dw = MyBitmap.Width / 30;
int dh = MyBitmap.Height;
Graphics g = this.pictureBox1.CreateGraphics();
g.Clear(Color.Gray);
Point[] MyPoint = new Point[30];
for (int x = 0; x < 30; x++)
{
MyPoint[x].Y = 0;
MyPoint[x].X = x * dw;
}
Bitmap bitmap = new Bitmap(MyBitmap.Width, MyBitmap.Height);
for (int i = 0; i < dw; i++)
{
for (int j = 0; j < 30; j++)
{
for (int k = 0; k < dh; k++)
{
bitmap.SetPixel(MyPoint[j].X + i, MyPoint[j].Y + k,
MyBitmap.GetPixel(MyPoint[j].X + i, MyPoint[j].Y + k));
}
this.pictureBox1.Refresh();
this.pictureBox1.Image = bitmap;
System.Threading.Thread.Sleep(100);
}
}
catch (Exception ex)
{
MessageBox.Show(ex.Message, "信息提示");
}
}
private void button3_Click(object sender, EventArgs e)
{
//水平百叶窗显示图像
try
{
MyBitmap = (Bitmap)this.pictureBox1.Image.Clone();
int dh = MyBitmap.Height / 20;
int dw = MyBitmap.Width;
Graphics g = this.pictureBox1.CreateGraphics();
g.Clear(Color.Gray);
Point[] MyPoint = new Point[20];
for (int y = 0; y < 20; y++)
{
MyPoint[y].X = 0;
MyPoint[y].Y = y * dh;
}
Bitmap bitmap = new Bitmap(MyBitmap.Width, MyBitmap.Height);
for (int i = 0; i < dh; i++)
{
for (int j = 0; j < 20; j++)
{
for (int k = 0; k < dw; k++)
{
bitmap.SetPixel(MyPoint[j].X + k, MyPoint[j].Y + i, MyBitmap.GetPixel(MyPoint[j].X + k, MyPoint[j].Y + i));
}
}
this.pictureBox1.Refresh();
this.pictureBox1.Image = bitmap;
System.Threading.Thread.Sleep(100);
}
}
catch (Exception ex)
{
MessageBox.Show(ex.Message, "信息提示");
}
}
九.马赛克效果
原理:确定图像的随机位置点和确定马赛克块的大小,然后马赛克块图像覆盖随机点即可.
实现代码:
private void button1_Click(object sender, EventArgs e)
{
//以马赛克效果显示图像
try
{
int dw = MyBitmap.Width / 50;
int dh = MyBitmap.Height / 50;
Graphics g = this.pictureBox1.CreateGraphics();
g.Clear(Color.Gray);
Point[] MyPoint = new Point[2500];
for (int x = 0; x < 50; x++)
for (int y = 0; y < 50; y++)
{
MyPoint[x * 50 + y].X = x * dw;
MyPoint[x * 50 + y].Y = y * dh;
}
Bitmap bitmap = new Bitmap(MyBitmap.Width, MyBitmap.Height);
for (int i = 0; i < 10000; i++)
{
System.Random MyRandom = new Random();
int iPos = MyRandom.Next(2500);
for (int m = 0; m < dw; m++)
for (int n = 0; n < dh; n++)
{
bitmap.SetPixel(MyPoint[iPos].X + m, MyPoint[iPos].Y + n, MyBitmap.GetPixel(MyPoint[iPos].X + m, MyPoint[iPos].Y + n));
}
this.pictureBox1.Refresh();
this.pictureBox1.Image = bitmap;
}
for (int i = 0; i < 2500; i++)
for (int m = 0; m < dw; m++)
for (int n = 0; n < dh; n++)
{
bitmap.SetPixel(MyPoint[i].X + m, MyPoint[i].Y + n, MyBitmap.GetPixel(MyPoint[i].X + m, MyPoint[i].Y + n));
} this.pictureBox1.Refresh();
this.pictureBox1.Image = bitmap;
}
catch (Exception ex)
{
MessageBox.Show(ex.Message, "信息提示");
}
}
十:油画效果
原理: 对图像中某一范围内的像素引入随机值.
实现代码:
private void button1_Click(object sender, EventArgs e)
{
//以油画效果显示图像
Graphics g = this.panel1.CreateGraphics();
Bitmap bitmap = this.MyBitmap;
//取得图片尺寸
int width = MyBitmap.Width;
int height = MyBitmap.Height;
RectangleF rect = new RectangleF(0, 0, width, height);
Bitmap img = MyBitmap.Clone(rect, System.Drawing.Imaging.PixelFormat.DontCare);
//产生随机数序列
Random rnd = new Random();
//取不同的值决定油画效果的不同程度
int iModel = 2;
int i = width - iModel;
while (i > 1)
{
int j = height - iModel;
while (j > 1)
{
int iPos = rnd.Next(100000) % iModel;
//将该点的RGB值设置成附近iModel点之内的任一点
Color color = img.GetPixel(i + iPos, j + iPos);
img.SetPixel(i, j, color);
j = j - 1;
}
i = i - 1;
}
//重新绘制图像
g.Clear(Color.White);
g.DrawImage(img, new Rectangle(0, 0, width, height));
}
十一: 扭曲效果
原理: 将图像缩放为一个非矩形的平等四边形即可
实现代码:
private void button1_Click(object sender, EventArgs e)
{
//以扭曲效果显示图像
if (h == panel1.Height/2)
{
w = 0;
h = 0;
}
Size offset =new Size (w++,h++);
//设置偏移量
Graphics g = panel1.CreateGraphics();
Rectangle rect = this.panel1.ClientRectangle;
Point[] points = new Point[3];
points[0] = new Point(rect.Left+offset.Width ,rect.Top +offset .Height);
points[1] = new Point(rect.Right, rect.Top + offset.Height);
points[2] = new Point(rect.Left, rect.Bottom - offset.Height);
g.Clear(Color.White);
g.DrawImage(MyBitmap, points);
}
十二.积木效果
原理: 对图像中的各个像素点着重(即加大分像素的颜色值)着色.
实现代码:
private void button1_Click(object sender, EventArgs e)
{
//以积木效果显示图像
try
{
Graphics myGraphics = this.panel1.CreateGraphics ();
//Bitmap myBitmap = new Bitmap(this.BackgroundImage);
int myWidth, myHeight, i, j, iAvg, iPixel;
Color myColor, myNewColor;
RectangleF myRect;
myWidth = MyBitmap.Width;
myHeight = MyBitmap.Height;
myRect = new RectangleF(0, 0, myWidth, myHeight);
Bitmap bitmap = MyBitmap.Clone(myRect, System.Drawing.Imaging.PixelFormat.DontCare);
i = 0;
while (i < myWidth - 1)
{
j = 0;
while (j < myHeight - 1)
{
myColor = bitmap.GetPixel(i, j);
iAvg = (myColor.R + myColor.G + myColor.B) / 3;
iPixel = 0;
if (iAvg >= 128)
iPixel = 255;
else
iPixel = 0;
myNewColor = Color.FromArgb(255, iPixel, iPixel, iPixel);
bitmap.SetPixel(i, j, myNewColor);
j = j + 1;
}
i = i + 1;
}
myGraphics.Clear(Color.WhiteSmoke);
myGraphics.DrawImage(bitmap, new Rectangle(0, 0, myWidth, myHeight));
}
catch (Exception ex)
{
MessageBox.Show(ex.Message, "信息提示");
}
}
这些也许能说明一下 PPT或者手机中的图片效果处理程序是如果做出来的.原理应该是相通的.
制作图像一般常用的类有: Bitmap; Graphics; Rectangle;Color; 用到的方法是 Graphics类的DrawImage;