class没有发布到tomcat_Tomcat 在 SpringBoot 中是如何启动的
- 前言[1]
- 从 Main 方法说起[2]
- 走进 Tomcat 内部[3]
- 总结[4]
- 《Java 2019 超神之路》
- 《Dubbo 实现原理与源码解析 —— 精品合集》
- 《Spring 实现原理与源码解析 —— 精品合集》
- 《MyBatis 实现原理与源码解析 —— 精品合集》
- 《Spring MVC 实现原理与源码解析 —— 精品合集》
- 《Spring Boot 实现原理与源码解析 —— 精品合集》
- 《数据库实体设计合集》
- 《Java 面试题 —— 精品合集》
- 《Java 学习指南 —— 精品合集》
前言
我们知道 SpringBoot 给我们带来了一个全新的开发体验,我们可以直接把 web 程序达成 jar 包,直接启动,这就得益于 SpringBoot 内置了容器,可以直接启动,本文将以 Tomcat 为例,来看看 SpringBoot 是如何启动 Tomcat 的,同时也将展开学习下 Tomcat 的源码,了解 Tomcat 的设计。
从 Main 方法说起
用过 SpringBoot 的人都知道,首先要写一个 main 方法来启动
@SpringBootApplication
public class TomcatdebugApplication {public static void main(String[] args) {SpringApplication.run(TomcatdebugApplication.class, args);}}
我们直接点击 run 方法的源码,跟踪下来,发下最终的 run 方法是调用 ConfigurableApplicationContext 方法,源码如下:
public ConfigurableApplicationContext run(String... args) {StopWatch stopWatch = new StopWatch();stopWatch.start();ConfigurableApplicationContext context = null;Collection exceptionReporters = new ArrayList<>();//设置系统属性『java.awt.headless』,为true则启用headless模式支持configureHeadlessProperty();//通过*SpringFactoriesLoader*检索*META-INF/spring.factories*,//找到声明的所有SpringApplicationRunListener的实现类并将其实例化,//之后逐个调用其started()方法,广播SpringBoot要开始执行了SpringApplicationRunListeners listeners = getRunListeners(args);//发布应用开始启动事件listeners.starting();try {//初始化参数ApplicationArguments applicationArguments = new DefaultApplicationArguments(args);//创建并配置当前SpringBoot应用将要使用的Environment(包括配置要使用的PropertySource以及Profile),//并遍历调用所有的SpringApplicationRunListener的environmentPrepared()方法,广播Environment准备完毕。ConfigurableEnvironment environment = prepareEnvironment(listeners, applicationArguments);configureIgnoreBeanInfo(environment);//打印bannerBanner printedBanner = printBanner(environment);//创建应用上下文context = createApplicationContext();//通过*SpringFactoriesLoader*检索*META-INF/spring.factories*,获取并实例化异常分析器exceptionReporters = getSpringFactoriesInstances(SpringBootExceptionReporter.class,new Class[] { ConfigurableApplicationContext.class }, context);//为ApplicationContext加载environment,之后逐个执行ApplicationContextInitializer的initialize()方法来进一步封装ApplicationContext,//并调用所有的SpringApplicationRunListener的contextPrepared()方法,【EventPublishingRunListener只提供了一个空的contextPrepared()方法】,//之后初始化IoC容器,并调用SpringApplicationRunListener的contextLoaded()方法,广播ApplicationContext的IoC加载完成,//这里就包括通过**@EnableAutoConfiguration**导入的各种自动配置类。prepareContext(context, environment, listeners, applicationArguments, printedBanner);//刷新上下文refreshContext(context);//再一次刷新上下文,其实是空方法,可能是为了后续扩展。afterRefresh(context, applicationArguments);stopWatch.stop();if (this.logStartupInfo) {new StartupInfoLogger(this.mainApplicationClass).logStarted(getApplicationLog(), stopWatch);}//发布应用已经启动的事件listeners.started(context);//遍历所有注册的ApplicationRunner和CommandLineRunner,并执行其run()方法。//我们可以实现自己的ApplicationRunner或者CommandLineRunner,来对SpringBoot的启动过程进行扩展。callRunners(context, applicationArguments);}catch (Throwable ex) {handleRunFailure(context, ex, exceptionReporters, listeners);throw new IllegalStateException(ex);}try {//应用已经启动完成的监听事件listeners.running(context);}catch (Throwable ex) {handleRunFailure(context, ex, exceptionReporters, null);throw new IllegalStateException(ex);}return context;}
其实这个方法我们可以简单的总结下步骤为 > 1. 配置属性 > 2. 获取监听器,发布应用开始启动事件 > 3. 初始化输入参数 > 4. 配置环境,输出 banner > 5. 创建上下文 > 6. 预处理上下文 > 7. 刷新上下文 > 8. 再刷新上下文 > 9. 发布应用已经启动事件 > 10. 发布应用启动完成事件
其实上面这段代码,如果只要分析 tomcat 内容的话,只需要关注两个内容即可,上下文是如何创建的,上下文是如何刷新的,分别对应的方法就是 createApplicationContext() 和 refreshContext(context),接下来我们来看看这两个方法做了什么。
protected ConfigurableApplicationContext createApplicationContext() {Class contextClass = this.applicationContextClass;if (contextClass == null) {try {switch (this.webApplicationType) {case SERVLET:contextClass = Class.forName(DEFAULT_SERVLET_WEB_CONTEXT_CLASS);break;case REACTIVE:contextClass = Class.forName(DEFAULT_REACTIVE_WEB_CONTEXT_CLASS);break;default:contextClass = Class.forName(DEFAULT_CONTEXT_CLASS);}}catch (ClassNotFoundException ex) {throw new IllegalStateException("Unable create a default ApplicationContext, " + "please specify an ApplicationContextClass",ex);}}return (ConfigurableApplicationContext) BeanUtils.instantiateClass(contextClass);}
这里就是根据我们的 webApplicationType 来判断创建哪种类型的 Servlet,代码中分别对应着 Web 类型(SERVLET),响应式 Web 类型(REACTIVE),非 Web 类型(default),我们建立的是 Web 类型,所以肯定实例化 DEFAULT_SERVLET_WEB_CONTEXT_CLASS 指定的类,也就是 AnnotationConfigServletWebServerApplicationContext 类,我们来用图来说明下这个类的关系

通过这个类图我们可以知道,这个类继承的是 ServletWebServerApplicationContext,这就是我们真正的主角,而这个类最终是继承了 AbstractApplicationContext,了解完创建上下文的情况后,我们再来看看刷新上下文,相关代码如下:
//类:SpringApplication.javaprivate void refreshContext(ConfigurableApplicationContext context) {//直接调用刷新方法refresh(context);if (this.registerShutdownHook) {try {context.registerShutdownHook();}catch (AccessControlException ex) {// Not allowed in some environments.}}}
//类:SpringApplication.javaprotected void refresh(ApplicationContext applicationContext) {Assert.isInstanceOf(AbstractApplicationContext.class, applicationContext);((AbstractApplicationContext) applicationContext).refresh();}
这里还是直接传递调用本类的 refresh(context)方法,最后是强转成父类 AbstractApplicationContext 调用其 refresh()方法,该代码如下:
// 类:AbstractApplicationContext
public void refresh() throws BeansException, IllegalStateException {synchronized (this.startupShutdownMonitor) {// Prepare this context for refreshing.prepareRefresh();// Tell the subclass to refresh the internal bean factory.ConfigurableListableBeanFactory beanFactory = obtainFreshBeanFactory();// Prepare the bean factory for use in this context.prepareBeanFactory(beanFactory);try {// Allows post-processing of the bean factory in context subclasses.postProcessBeanFactory(beanFactory);// Invoke factory processors registered as beans in the context.invokeBeanFactoryPostProcessors(beanFactory);// Register bean processors that intercept bean creation.registerBeanPostProcessors(beanFactory);// Initialize message source for this context.initMessageSource();// Initialize event multicaster for this context.initApplicationEventMulticaster();// Initialize other special beans in specific context subclasses.这里的意思就是调用各个子类的onRefresh()onRefresh();// Check for listener beans and register them.registerListeners();// Instantiate all remaining (non-lazy-init) singletons.finishBeanFactoryInitialization(beanFactory);// Last step: publish corresponding event.finishRefresh();}catch (BeansException ex) {if (logger.isWarnEnabled()) {logger.warn("Exception encountered during context initialization - " +"cancelling refresh attempt: " + ex);}// Destroy already created singletons to avoid dangling resources.destroyBeans();// Reset 'active' flag.cancelRefresh(ex);// Propagate exception to caller.throw ex;}finally {// Reset common introspection caches in Spring's core, since we// might not ever need metadata for singleton beans anymore...resetCommonCaches();}}}
这里我们看到 onRefresh()方法是调用其子类的实现,根据我们上文的分析,我们这里的子类是 ServletWebServerApplicationContext。
//类:ServletWebServerApplicationContext
protected void onRefresh() {super.onRefresh();try {createWebServer();}catch (Throwable ex) {throw new ApplicationContextException("Unable to start web server", ex);}}private void createWebServer() {WebServer webServer = this.webServer;ServletContext servletContext = getServletContext();if (webServer == null && servletContext == null) {ServletWebServerFactory factory = getWebServerFactory();this.webServer = factory.getWebServer(getSelfInitializer());}else if (servletContext != null) {try {getSelfInitializer().onStartup(servletContext);}catch (ServletException ex) {throw new ApplicationContextException("Cannot initialize servlet context", ex);}}initPropertySources();}
到这里,其实庐山真面目已经出来了,createWebServer()就是启动 web 服务,但是还没有真正启动 Tomcat,既然 webServer 是通过 ServletWebServerFactory 来获取的,我们就来看看这个工厂的真面目。
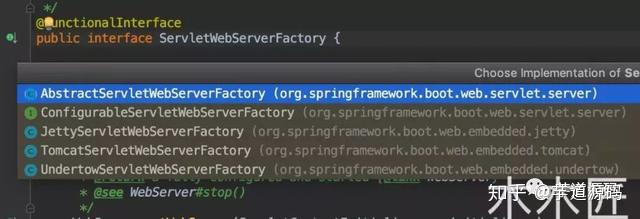
走进 Tomcat 内部
根据上图我们发现,工厂类是一个接口,各个具体服务的实现是由各个子类来实现的,所以我们就去看看 TomcatServletWebServerFactory.getWebServer()的实现。
@Overridepublic WebServer getWebServer(ServletContextInitializer... initializers) {Tomcat tomcat = new Tomcat();File baseDir = (this.baseDirectory != null) ? this.baseDirectory : createTempDir("tomcat");tomcat.setBaseDir(baseDir.getAbsolutePath());Connector connector = new Connector(this.protocol);tomcat.getService().addConnector(connector);customizeConnector(connector);tomcat.setConnector(connector);tomcat.getHost().setAutoDeploy(false);configureEngine(tomcat.getEngine());for (Connector additionalConnector : this.additionalTomcatConnectors) {tomcat.getService().addConnector(additionalConnector);}prepareContext(tomcat.getHost(), initializers);return getTomcatWebServer(tomcat);}
根据上面的代码,我们发现其主要做了两件事情,第一件事就是把 Connnctor(我们称之为连接器)对象添加到 Tomcat 中,第二件事就是 configureEngine,这连接器我们勉强能理解(不理解后面会述说),那这个 Engine 是什么呢?我们查看 tomcat.getEngine()的源码:
public Engine getEngine() {Service service = getServer().findServices()[0];if (service.getContainer() != null) {return service.getContainer();}Engine engine = new StandardEngine();engine.setName( "Tomcat" );engine.setDefaultHost(hostname);engine.setRealm(createDefaultRealm());service.setContainer(engine);return engine;}
根据上面的源码,我们发现,原来这个 Engine 是容器,我们继续跟踪源码,找到 Container 接口
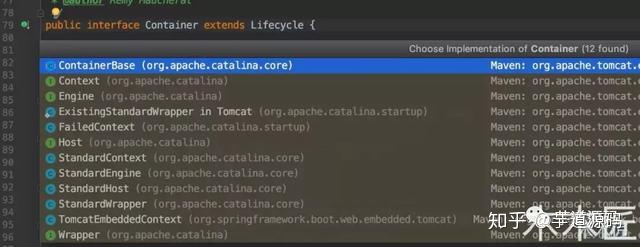
上图中,我们看到了 4 个子接口,分别是 Engine,Host,Context,Wrapper。我们从继承关系上可以知道他们都是容器,那么他们到底有啥区别呢?我看看他们的注释是怎么说的。
/**If used, an Engine is always the top level Container in a Catalina* hierarchy. Therefore, the implementation's setParent() method* should throw IllegalArgumentException.** @author Craig R. McClanahan*/
public interface Engine extends Container {//省略代码
}
/*** * The parent Container attached to a Host is generally an Engine, but may* be some other implementation, or may be omitted if it is not necessary.*
* The child containers attached to a Host are generally implementations* of Context (representing an individual servlet context).** @author Craig R. McClanahan*/
public interface Host extends Container {
//省略代码}
/***
* The parent Container attached to a Context is generally a Host, but may* be some other implementation, or may be omitted if it is not necessary.*
* The child containers attached to a Context are generally implementations* of Wrapper (representing individual servlet definitions).*
** @author Craig R. McClanahan*/
public interface Context extends Container, ContextBind {//省略代码
}
/**
* The parent Container attached to a Wrapper will generally be an* implementation of Context, representing the servlet context (and* therefore the web application) within which this servlet executes.*
* Child Containers are not allowed on Wrapper implementations, so the* addChild() method should throw an* IllegalArgumentException.** @author Craig R. McClanahan*/
public interface Wrapper extends Container {//省略代码
}
上面的注释翻译过来就是,Engine 是最高级别的容器,其子容器是 Host,Host 的子容器是 Context,Wrapper 是 Context 的子容器,所以这 4 个容器的关系就是父子关系,也就是 Engine>Host>Context>Wrapper。我们再看看 Tomcat 类的源码:
//部分源码,其余部分省略。
public class Tomcat {
//设置连接器public void setConnector(Connector connector) {Service service = getService();boolean found = false;for (Connector serviceConnector : service.findConnectors()) {if (connector == serviceConnector) {found = true;}}if (!found) {service.addConnector(connector);}}//获取servicepublic Service getService() {return getServer().findServices()[0];}//设置Host容器public void setHost(Host host) {Engine engine = getEngine();boolean found = false;for (Container engineHost : engine.findChildren()) {if (engineHost == host) {found = true;}}if (!found) {engine.addChild(host);}}//获取Engine容器public Engine getEngine() {Service service = getServer().findServices()[0];if (service.getContainer() != null) {return service.getContainer();}Engine engine = new StandardEngine();engine.setName( "Tomcat" );engine.setDefaultHost(hostname);engine.setRealm(createDefaultRealm());service.setContainer(engine);return engine;}//获取serverpublic Server getServer() {if (server != null) {return server;}System.setProperty("catalina.useNaming", "false");server = new StandardServer();initBaseDir();// Set configuration sourceConfigFileLoader.setSource(new CatalinaBaseConfigurationSource(new File(basedir), null));server.setPort( -1 );Service service = new StandardService();service.setName("Tomcat");server.addService(service);return server;}//添加Context容器public Context addContext(Host host, String contextPath, String contextName,String dir) {silence(host, contextName);Context ctx = createContext(host, contextPath);ctx.setName(contextName);ctx.setPath(contextPath);ctx.setDocBase(dir);ctx.addLifecycleListener(new FixContextListener());if (host == null) {getHost().addChild(ctx);} else {host.addChild(ctx);}//添加Wrapper容器public static Wrapper addServlet(Context ctx,String servletName,Servlet servlet) {// will do class for name and set init paramsWrapper sw = new ExistingStandardWrapper(servlet);sw.setName(servletName);ctx.addChild(sw);return sw;}}
阅读 Tomcat 的 getServer()我们可以知道,Tomcat 的最顶层是 Server,Server 就是 Tomcat 的实例,一个 Tomcat 一个 Server;通过 getEngine()我们可以了解到 Server 下面是 Service,而且是多个,一个 Service 代表我们部署的一个应用,而且我们还可以知道,Engine 容器,一个 service 只有一个;根据父子关系,我们看 setHost()源码可以知道,host 容器有多个;同理,我们发现 addContext()源码下,Context 也是多个;addServlet()表明 Wrapper 容器也是多个,而且这段代码也暗示了,其实 Wrapper 和 Servlet 是一层意思。另外我们根据 setConnector 源码可以知道,连接器(Connector)是设置在 service 下的,而且是可以设置多个连接器(Connector)。
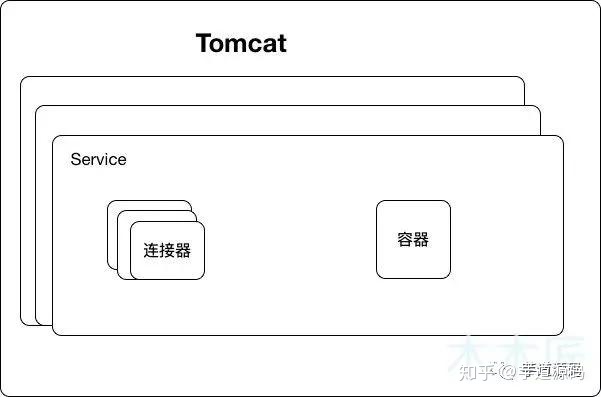
根据上面分析,我们可以小结下:Tomcat 主要包含了 2 个核心组件,连接器(Connector)和容器(Container),用图表示如下:
一个 Tomcat 是一个 Server,一个 Server 下有多个 service,也就是我们部署的多个应用,一个应用下有多个连接器(Connector)和一个容器(Container),容器下有多个子容器,关系用图表示如下:
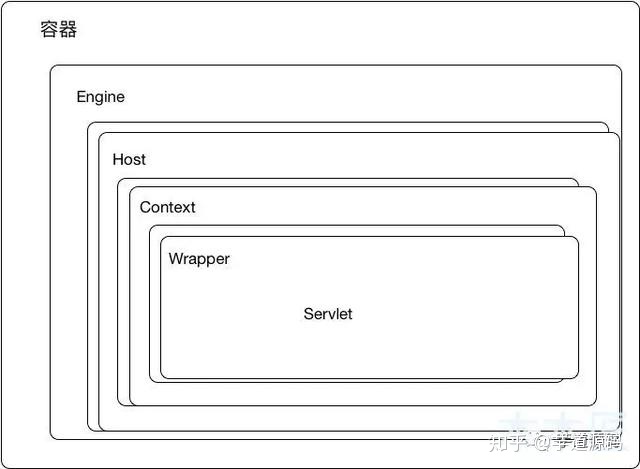
Engine 下有多个 Host 子容器,Host 下有多个 Context 子容器,Context 下有多个 Wrapper 子容器。
总结
SpringBoot 的启动是通过 new SpringApplication()实例来启动的,启动过程主要做如下几件事情:> 1. 配置属性 > 2. 获取监听器,发布应用开始启动事件 > 3. 初始化输入参数 > 4. 配置环境,输出 banner > 5. 创建上下文 > 6. 预处理上下文 > 7. 刷新上下文 > 8. 再刷新上下文 > 9. 发布应用已经启动事件 > 10. 发布应用启动完成事件
而启动 Tomcat 就是在第 7 步中“刷新上下文”;Tomcat 的启动主要是初始化 2 个核心组件,连接器(Connector)和容器(Container),一个 Tomcat 实例就是一个 Server,一个 Server 包含多个 Service,也就是多个应用程序,每个 Service 包含多个连接器(Connetor)和一个容器(Container),而容器下又有多个子容器,按照父子关系分别为:Engine,Host,Context,Wrapper,其中除了 Engine 外,其余的容器都是可以有多个。
更多相关:
-
英语的重要性,毋庸置疑!尤其对广大职场人士,掌握英语意味着就多了一项竞争的技能。那,对于我们成人来说,时间是最宝贵的。如何短时间内在英语方面有所突破,这是我们最关心的事情。英语学习,到底有没有捷径可以走,是否可以速成?周老师在这里明确告诉大家,英语学习,没有绝对的捷径走,但是可以少走弯路。十多年的教学经验告诉我们,成功的学习方法可以借...
-
展开全部 其实IDLE提供了一个显32313133353236313431303231363533e78988e69d8331333365663438示所有行和所有字符的功能。 我们打开IDLE shell或者IDLE编辑器,可以看到左下角有个Ln和Col,事实上,Ln是当前光标所在行,Col是当前光标所在列。 我们如果想得到文件代码...
-
【本文摘要】【注】本文所述内容为学习Yjango《学习观》相关视频之后的总结,观点归Yjango所有,本文仅作为学习之用。阅读本节,会让你对英语这类运动类知识的学习豁然开朗,你会知道英语学习方面,我们的症结所在。学习英语这类运动类知识,需要把握四个原则第一,不要用主动意识。第二,关注于端对端第三,输入输出符合实际情况第四,通过多个例子...
-
点云PCL免费知识星球,点云论文速读。文章:RGB-D SLAM with Structural Regularities作者:Yanyan Li , Raza Yunus , Nikolas Brasch , Nassir Navab and Federico Tombari编译:点云PCL代码:https://github.co...
-
简介 它是一个全新的基于容器技术的分布式解决方案,基于强大的自动化机制解决传统系统架构中负载均衡和实施部署的问题,从而节省了30%开发成本,其次具有完备的集群能力, 包括服务注册、服务发现、故障的发现和修复、服务滚动升级、在线扩容、健康监测等能力。使用kubernetes可以是开发人员更多精力在业务实现上,同时全面的拥抱微服务架构...
-
这段时间主要是学习了对容器的操作,包括:容器的状态:start,stop,restart,rename,pause,unpause,rm,attach,exec,kill,logs;还学习了对容器的资源进行限制的操作,包括:CPU(- c),内存(-m --memory-swap),blkio IO(--device-weight...
-
什么是容器 首先,我们必须理解一下什么是容器,在C++ 中容器被定义为:在数据存储上,有一种对象类型,它可以持有其它对象或指向其它对像的指针,这种对象类型就叫做容器。很简单,容器就是保存其它对象的对象,当然这是一个朴素的理解,这种“对象”还包含了一系列处理“其它对象”的方法,因为这些方法在程序的设计上会经常被用到,所以容器也体现...
-
本文基于CentOS 64位 一、mysql设置开机启动 1、cp /usr/local/mysql/support-files/mysql.server /etc/init.d/mysql 将服务文件拷贝到init.d下,并重命名为mysql 2、chmod +x /etc/init.d/mysql 赋予可执行权限...
-
centos7中使用yum安装tomcat 介绍 Apache Tomcat是用于提供Java应用程序的Web服务器和servlet容器。 Tomcat是Apache Software Foundation发布的Java Servlet和JavaServer Pages技术的开源实现。 本教程介绍在CentOS 7服务器上使用yu...