一:Service简介
Android开发中,当需要创建在后台运行的程序的时候,就要使用到Service。
1:Service(服务)是一个没有用户界面的在后台运行执行耗时操作的应用组件。其他应用组件能够启动Service,并且当用户切换到另外的应用场景,Service将持续在后台运行。另外,一个组件能够绑定到一个service与之交互(IPC机制),例如,一个service可能会处理网络操作,播放音乐,操作文件I/O或者与内容提供者(content provider)交互,所有这些活动都是在后台进行。
2:Service有两种状态,“启动的”和“绑定:
通过startService()启动的服务处于“启动的”状态,一旦启动,service就在后台运行,即使启动它的应用组件已经被销毁了。通常started状态的service执行单任务并且不返回任何结果给启动者。比如当下载或上传一个文件,当这项操作完成时,service应该停止它本身。
还有一种“绑定”状态的service,通过调用bindService()来启动,一个绑定的service提供一个允许组件与service交互的接口,可以发送请求、获取返回结果,还可以通过夸进程通信来交互(IPC)。绑定的service只有当应用组件绑定后才能运行,多个组件可以绑定一个service,当调用unbind()方法时,这个service就会被销毁了。
3:service与activity一样都存在与当前进程的主线程中,所以,一些阻塞UI的操作,比如耗时操作不能放在service里进行,比如另外开启一个线程来处理诸如网络请求的耗时操作。如果在service里进行一些耗CPU和耗时操作,可能会引发ANR警告,这时应用会弹出是强制关闭还是等待的对话框。所以,对service的理解就是和activity平级的,只不过是看不见的,在后台运行的一个组件,这也是为什么和activity同被说为Android的基本组件。
二:Service的生命周期
Android Service生命周期与Activity生命周期是相似的,但是也存在一些细节上也存在着重要的不同:
onCreate和onStart是不同的
通过从客户端调用Context.startService(Intent)方法我们可以启动一个服务。如果这个服务还没有运行,Android将启动它并且在onCreate方法之后调用它的onStart方法。如果这个服务已经在运行,那么它的onStart方法将被新的Intent再次调用。所以对于单个运行的Service它的onStart方法被反复调用是完全可能的并且是很正常的。
onResume、onPause以及onStop是不需要的
回调一个服务通常是没有用户界面的,所以我们也就不需要onPause、onResume或者onStop方法了。无论何时一个运行中的Service它总是在后台运行。
onBind
如果一个客户端需要持久的连接到一个服务,那么他可以调用Context.bindService方法。如果这个服务没有运行方法将通过调用onCreate方法去创建这个服务但并不调用onStart方法来启动它。相反,onBind方法将被客户端的Intent调用,并且它返回一个IBind对象以便客户端稍后可以调用这个服务。同一服务被客户端同时启动和绑定是很正常的。
onDestroy
与Activity一样,当一个服务被结束是onDestroy方法将会被调用。当没有客户端启动或绑定到一个服务时Android将终结这个服务。与很多Activity时的情况一样,当内存很低的时候Android也可能会终结一个服务。如果这种情况发生,Android也可能在内存够用的时候尝试启动被终止的服务,所以你的服务必须为重启持久保存信息,并且最好在onStart方法内来做。
三.Service的启动方式
Service的启动方式有如下2种
CstartService()和bindService(),这两种方式对Service生命周期的影响是不同的。

startservice是由其他组件调用startService()方法启动的,这导致服务的onStartCommand()方法被调用,当服务是started状态时,其生命周期与启动它的组件无关,并且可以在后台无限期运行,即使启动服务的组件已经被销毁。因此,服务需要在完成任务后调用stopself()方法停止,或者有其他组件调用stopService()方法停止。
使用bindService()方法启用服务,调用者与服务绑定在了一起,调用者一旦退出,服务也就终止,大有‘不求同生,但求同死’的特点
Android应用中每个Service都必须要在AndroidMainifest.Xml配置文件中声明。
四:2种启动方式的具体例子
启动时,startService –> onCreate() –> onStart()
停止时,stopService –> onDestroy()
startService()方式启动 Service的方法:
xml version="1.0" encoding="utf-8"?>
<LinearLayout xmlns:android="http://schemas.android.com/apk/res/android" android:orientation="vertical" android:layout_width="fill_parent" android:layout_height="fill_parent" > <Button android:id="@+id/startBtn" android:layout_width="match_parent" android:layout_height="wrap_content" android:text="启动 Service" /> <Button android:id="@+id/stopBtn" android:layout_width="match_parent" android:layout_height="wrap_content" android:text="停止 Service" />
LinearLayout>
MainActivity.java
package com.android.service.activity;  import android.app.Activity;
import android.content.Intent;
import android.os.Bundle;
import android.view.View;
import android.view.View.OnClickListener;
import android.widget.Button;  public class MainActivity extends Activity
{  private Button startBtn;  private Button stopBtn;  @Override public void onCreate(Bundle savedInstanceState)  {  super.onCreate(savedInstanceState);  setContentView(R.layout.main);  startBtn = (Button) findViewById(R.id.startBtn);  stopBtn = (Button) findViewById(R.id.stopBtn);  //添加监听器
        startBtn.setOnClickListener(listener);  stopBtn.setOnClickListener(listener);  }  //启动监听器  private OnClickListener listener=new OnClickListener()  {         @Override public void onClick(View v)  {  Intent intent=new Intent(MainActivity.this, ServiceDemo.class);  switch (v.getId())  {  case R.id.startBtn:  startService(intent);  break;  case R.id.stopBtn:  stopService(intent);  break;  default:  break;  }             }  };
}
新建ServiceDemo类,ServiceDemo.java如下
package com.android.service.activity;  import android.app.Service;
import android.content.Intent;
import android.os.IBinder;
import android.util.Log;  public class ServiceDemo extends Service
{  private static final String TAG="Test";  @Override //Service时被调用  public void onCreate()  {  Log.i(TAG, "Service onCreate--->");  super.onCreate();  }  @Override //当调用者使用startService()方法启动Service时,该方法被调用  public void onStart(Intent intent, int startId)  {  Log.i(TAG, "Service onStart--->");  super.onStart(intent, startId);  }  @Override //当Service不在使用时调用  public void onDestroy()  {  Log.i(TAG, "Service onDestroy--->");  super.onDestroy();  }  @Override //当使用startService()方法启动Service时,方法体内只需写return null  public IBinder onBind(Intent intent)  {  return null;  }
}
在AndroidManifest.xml文件中添加16~21行的声明
xml version="1.0" encoding="utf-8"?>
<manifest xmlns:android="http://schemas.android.com/apk/res/android" package="com.android.service.activity" android:versionCode="1" android:versionName="1.0"> <uses-sdk android:minSdkVersion="10" /> <application android:icon="@drawable/icon" android:label="@string/app_name"> <activity android:name=".MainActivity" android:label="@string/app_name"> <intent-filter> <action android:name="android.intent.action.MAIN" /> <category android:name="android.intent.category.LAUNCHER" /> intent-filter> activity> <service android:name=".ServiceDemo" >    <intent-filter> <action android:name="android.intent.action.MAIN" /> <category android:name="android.intent.category.LAUNCHER" /> intent-filter> service>    application>
manifest>
效果如下:

当点击![]() 按钮时,先后执行了Service中onCreate()->onStart()这两个方法,LogCat显示如下:
按钮时,先后执行了Service中onCreate()->onStart()这两个方法,LogCat显示如下:

当点击 ![]() 按钮时,Service则执行了onDestroy()方法,LogCat显示如下:
按钮时,Service则执行了onDestroy()方法,LogCat显示如下:

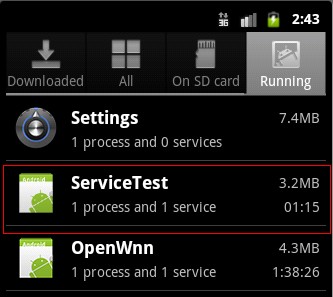
退出后,进入Settings(设置)->Applications(应用)->Running Services(正在运行的服务)看一下我们新启动了的服务,效果图如下:

绑定时,bindService -> onCreate() –> onBind()
xml version="1.0" encoding="utf-8"?>
<LinearLayout xmlns:android="http://schemas.android.com/apk/res/android" android:orientation="vertical" android:layout_width="fill_parent" android:layout_height="fill_parent" > <Button   android:text="启动Service"   android:id="@+id/startBtn1"   android:layout_width="match_parent"   android:layout_height="wrap_content" />    <Button   android:text="停止Service"   android:id="@+id/stopBtn2"   android:layout_width="match_parent"   android:layout_height="wrap_content" />    <Button   android:text="绑定Service"   android:id="@+id/bindBtn3"   android:layout_width="match_parent"   android:layout_height="wrap_content" /> <Button   android:text="解除绑定"   android:id="@+id/unbindBtn4"   android:layout_width="match_parent"   android:layout_height="wrap_content" />
LinearLayout>
MainActivity.java
package com.android.bindservice.activity;  import android.app.Activity;
import android.app.Service;
import android.content.ComponentName;
import android.content.Intent;
import android.content.ServiceConnection;
import android.os.Bundle;
import android.os.IBinder;
import android.util.Log;
import android.view.View;
import android.view.View.OnClickListener;
import android.widget.Button;  public class MainActivity extends Activity {  // 声明Button  private Button startBtn,stopBtn,bindBtn,unbindBtn;  @Override public void onCreate(Bundle savedInstanceState) {  super.onCreate(savedInstanceState);  // 设置当前布局视图
        setContentView(R.layout.main);  // 实例化Button  startBtn = (Button)findViewById(R.id.startBtn1);  stopBtn = (Button)findViewById(R.id.stopBtn2);  bindBtn = (Button)findViewById(R.id.bindBtn3);  unbindBtn = (Button)findViewById(R.id.unbindBtn4);  // 添加监听器
        startBtn.setOnClickListener(startListener);  stopBtn.setOnClickListener(stopListener);  bindBtn.setOnClickListener(bindListener);  unbindBtn.setOnClickListener(unBindListener);  }  // 启动Service监听器  private OnClickListener startListener = new OnClickListener() {  @Override public void onClick(View v) {  // 创建Intent  Intent intent = new Intent();  // 设置Class属性  intent.setClass(MainActivity.this, BindService.class);  // 启动该Service
            startService(intent);  }  };  // 停止Service监听器  private OnClickListener stopListener = new OnClickListener() {  @Override public void onClick(View v) {  // 创建Intent  Intent intent = new Intent();  // 设置Class属性  intent.setClass(MainActivity.this, BindService.class);  // 启动该Service
            stopService(intent);  }  };  // 连接对象  private ServiceConnection conn = new ServiceConnection() {  @Override public void onServiceConnected(ComponentName name, IBinder service) {  Log.i("Service", "连接成功!");  }  @Override public void onServiceDisconnected(ComponentName name) {  Log.i("Service", "断开连接!");  }  };  // 綁定Service监听器  private OnClickListener bindListener = new OnClickListener() {  @Override public void onClick(View v) {  // 创建Intent  Intent intent = new Intent();  // 设置Class属性  intent.setClass(MainActivity.this, BindService.class);  // 绑定Service
            bindService(intent, conn, Service.BIND_AUTO_CREATE);  }  };  // 解除绑定Service监听器  private OnClickListener unBindListener = new OnClickListener() {  @Override public void onClick(View v) {  // 创建Intent  Intent intent = new Intent();  // 设置Class属性  intent.setClass(MainActivity.this, BindService.class);  // 解除绑定Service
            unbindService(conn);  }  };
}
BindService.java
package com.android.bindservice.activity;  import android.app.Service;
import android.content.Intent;
import android.os.IBinder;
import android.util.Log;  public class BindService extends Service{  private static final String TAG="Test";  //返回null  public IBinder onBind(Intent intent) {  Log.i(TAG, "Service onBind--->");  return null;  }  // Service创建时调用  public void onCreate() {  Log.i(TAG, "Service onCreate--->");  }  // 当客户端调用startService()方法启动Service时,该方法被调用  public void onStart(Intent intent, int startId) {  Log.i(TAG, "Service onStart--->");  }  // 当Service不再使用时调用  public void onDestroy() {  Log.i(TAG, "Service onDestroy--->");  }  // 当解除绑定时调用  public boolean onUnbind(Intent intent) {    Log.i(TAG, "Service onUnbind--->");    return super.onUnbind(intent);    }
}
在AndroidManifest.xml文件中添加16~21行的声明
xml version="1.0" encoding="utf-8"?>
<manifest xmlns:android="http://schemas.android.com/apk/res/android" package="com.android.bindservice.activity" android:versionCode="1" android:versionName="1.0"> <uses-sdk android:minSdkVersion="10" /> <application android:icon="@drawable/icon" android:label="@string/app_name"> <activity android:name=".MainActivity" android:label="@string/app_name"> <intent-filter> <action android:name="android.intent.action.MAIN" /> <category android:name="android.intent.category.LAUNCHER" /> intent-filter> activity> <service android:name=".BindService" >    <intent-filter> <action android:name="android.intent.action.MAIN" /> <category android:name="android.intent.category.LAUNCHER" /> intent-filter> service> application>
manifest>
效果如下:

当点击![]() 按钮时,先后执行了Service中onCreate()->onStart()这两个方法,LogCat显示如下:
按钮时,先后执行了Service中onCreate()->onStart()这两个方法,LogCat显示如下:

当点击![]() 按钮,则Service执行了onUnbind()方法,LogCat显示如下:
按钮,则Service执行了onUnbind()方法,LogCat显示如下:

当点击![]() 按钮,则Service执行了onUnbind()方法,LogCat显示如下:
按钮,则Service执行了onUnbind()方法,LogCat显示如下:
